What is the Garden of Salvation?
Garden of Salvation is a raid released in the Shadowkeep expansion of Destiny 2. It was the epic conclusion of the Shadowkeep story. It revealed the looming threat of the Darkness.
While it is regarded as one of the less-liked expansions, Garden of Salvation is still the favorite raid of a lot of people. This also begs the question: why are the players sharply divided on this raid? Hopefully, I can explain this phenomenon in the following article.
The raid can be found on the Moon in the top right corner of the destination. Even though that’s where it appears in the directory, it actually takes place in the Black Garden.
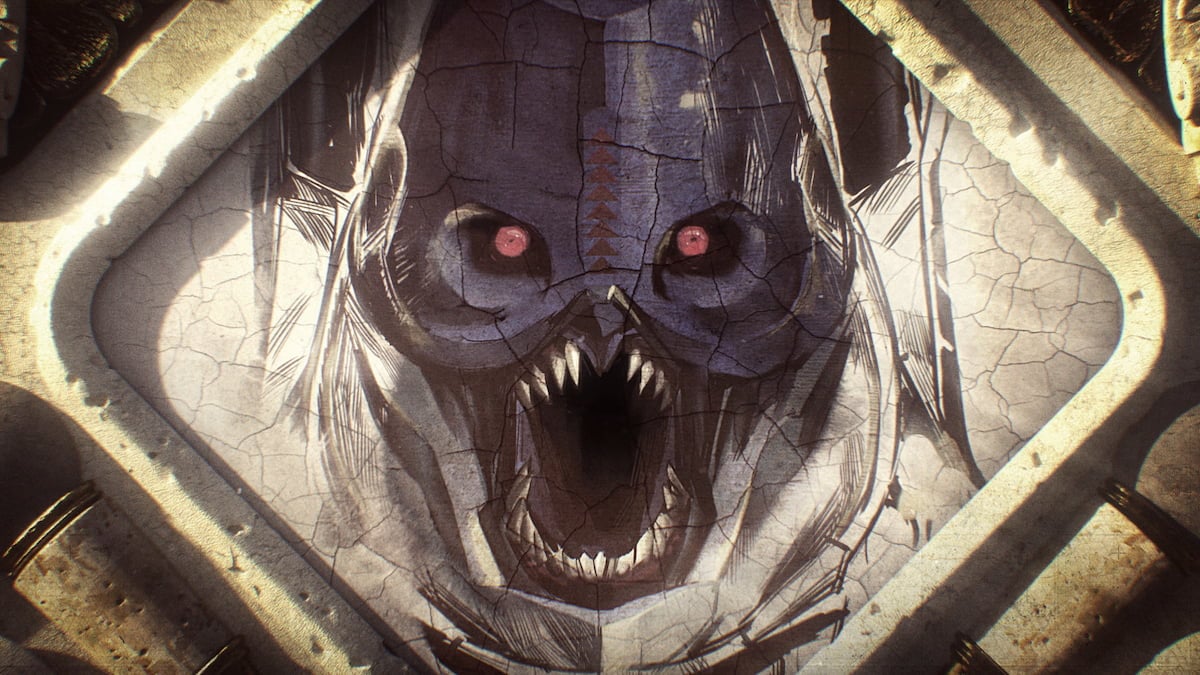
The main enemies in Garden of Salvation are the Vex: daunting robots with no crit spots. Thankfully, since the raid came out before Beyond Light, it doesn’t include any Wyverns.
The Garden of Salvation raid has a total of 4 encounters and hides one of the most potent exotic weapons in the game, it being the Divinity Exotic Trace Rifle, of course. You can see plenty of references to it in my Grandmaster Nightfall guide series.
So, without further ado, let’s get into the first encounter!

Encounter number 1: Evade the Consecrated Mind
Consecrated Mind introduces the first mechanic that we’ll be using throughout the entire raid. This mechanic is tethering. No, not the Hunter super, we’re talking about tethering to a radiolarian cube.
By chaining the tether to the rest of your teammates you can send the beam all the way to the roadblock. This will start the encounter so be ready to go as soon as that’s done.
Firstly you’ll need to split your team in half, team 1 (team staying) or team 2 (team going). The first team will stay in the initial room where the boss is and the other team will progress forward past the roadblock.
The entire raid is basically just watching a vex grow up. Hence in the first encounter, the Consecrated Mind is just a baby. So as you do with a baby you go around cleaning up after it.
Consecrated Mind will run around spitting up vex milk and it’s your job to clean it up by walking over it. Bear in mind, you can only do this once per rotation as you have a debuff. Once the debuff passes you can pick it up again.
The best idea is to split your team further in order of picking up the debuff. Make sure to let your allies know that you have the debuff! If you don’t notify your teammates, it can cause confusion and make players disregard the boss.
While team 1 does that, team 2 will continue to clear through mobs and will ultimately kill the Angelic. Killing the Angelic will unlock the radiolarian box and will let you tether to destroy the next roadblock. Rinse and repeat. Boom! The boss is done!
After running through the final roadblock you will be met with a bunch of cyclops. You can just ignore them and run, however, the Consecrated Mind will spit out a couple more debuffs for you to pick up. With that, the first encounter is done, and onto the next one.
Encounter 2: Summon the Consecrated Mind
Time to tether. Encounter 2 is all about splitting your team and making sure that everything is well covered. There is a layout that players use for clarity with numbers from 1 to 4 in a clockwise motion from the entrance.
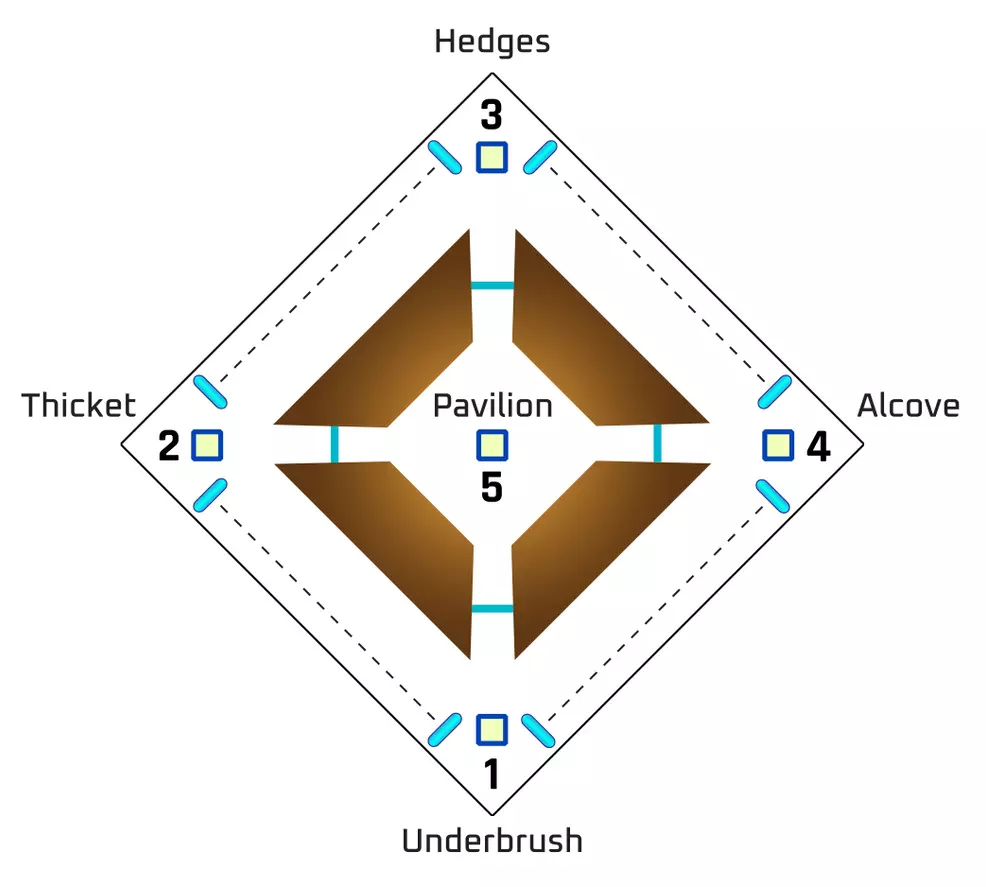
You enter the encounter from number 1 and 2 of your teammates should stay there. Tethering to the cube to get the enlightened buff and clearing mobs with shields. Failing to keep the enlightened buff will lead to you getting overwhelmed by mobs you can’t kill.
If 3 mobs sacrifice into the main pillars it will be a wipe. Hence why I mentioned it’s most important to organize your team well. The rest of your party should follow the clockwise motion and kill everything.
Upon reaching the second pillar you should all tether to the cube for the buff. Once you’ve done that, 3 of the 4 players should move on to the next pillar. The same goes for pillar number 3. Leave one person behind and keep going.
Once everyone is in place there should be 4 players who continuously stay on the point and 2 players who jump around. Why jump around? Because you need to keep refreshing the buff.
The first part will spawn 3 Angelics on one of the four pillars each rotation. There’s a total of 4 rotations, one per pillar. The rotating players will usually be stationed on the side where the Angelics are.
I’ve mentioned that it’s important to have a highly Enlightened uptime. The person on the first pillar should rebuff the person on the second pillar. Similarly, the person on the third pillar should rebuff the person on the fourth pillar.
This can be done in between phases and will require a lot of coordination on the side of the roaming players. Rinse and repeat this for 4 phases after which the roadblocks will open up. This will allow you to enter the middle area.
In the middle of the map, there will be a fifth pillar that you need to protect. Considering you will all be in one place, it should be no problem.
After 2 rotations of the Angelics, the encounter will end and you get to reap the rewards. With that, you have summoned the now adult Consecrated Mind and onwards to the next encounter.
Encounter 3: Defeat the Consecrated Mind
Finally, we get to slay the Consecrated Mind. This is by far my favorite encounter in the entire raid. The first thing you’ll need to do is split your team in half again. Team Eyes and Team Gambit.
Don’t worry, there’s no Drifter involved in this one. Team Eyes will of course be in charge of babysitting the boss. He will again spit up a debuff that you need to pick up. This time it will hold you in place but will also reveal which of his eyes are vulnerable.
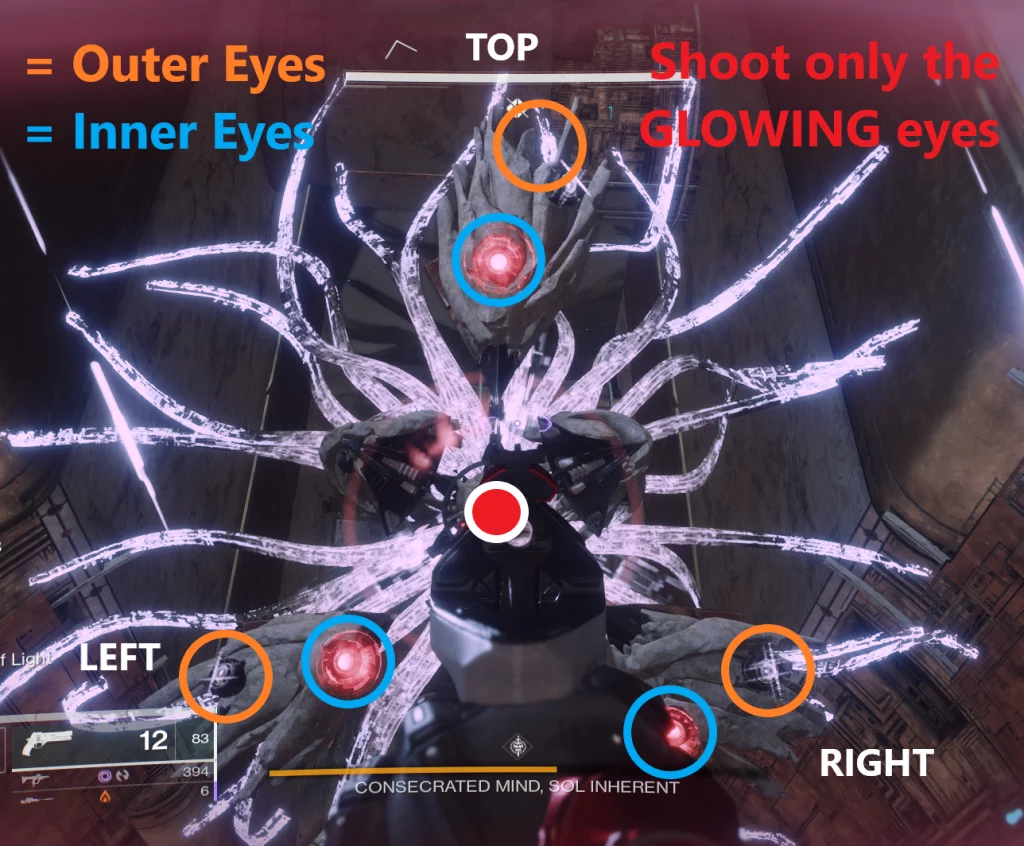
The eyes are split into an inner 3 and an outer 3, one for each player in the team. Once you shoot all 3 eyes the boss will stagger and go back to the middle. This will avoid the wipe mechanic and save the teammate who picked the debuff up.
You have 3 cycles to fill up the pillar which is the job of the Gambit team. When starting the encounter, there will be Minotaurs that spawn. When you kill a Minotaur he will drop 5 motes, this is where you come in.
Pick up the 5 motes and head straight to the pillar that is active. You’ll know which one is active as it will have a beam shooting up into the sky. Once you deposit the 5 motes you will gain the Enlightened buff and you will have to defend the pillar.
You can carry up to 10 motes. However, for the first one, I recommend grabbing just 5. This is so that you can get to the pillar before the mobs start sacrificing. If 3 mobs sacrifice you wipe, same as last time.
You require a total of 30 motes to lock out the pillar and start the DPS phase. A lot of teams like to opt into a “5-10-10-5” strategy. This will ensure you have a good Enlightened uptime and a quick lockout.
Lastly, once you’ve deposited 30 motes the boss will move all the way to the pillar. The Eyes team will rotate with the boss, this is a good time to put down your buffs. The boss will open up his wings revealing all his eyes.
Once you destroy all of his eyes the DPS phase begins. Linear fusion rifles with a Divinity combination will shred through the boss. There should be enough time to kill him in that phase and with that, the encounter is over.
Finally, we can move on to the jumping puzzle and the final boss. Time to cover the final encounter!
Encounter 4: Defeat the Sanctified Mind
This is the encounter that splits the community. You either love it or you hate it. The boss is exceptionally hard as it requires a lot of coordination.
For this encounter, you will want to split your team into 3 teams of 2 players. Team Gambit 1, team Gambit 2, and team Builders. This will all make more sense moving forward, trust me.
The boss is huge and naturally, with him being a Vex he is made up of multiple parts. Two of his spots are exposed, that being his right knee and his left shoulder. The encounter begins with you shooting him.
Once you start the boss mobs will spawn right below him. Clear all of these mobs and the Angelic in order to begin the first mechanic. Gambit team 1 will destroy his vulnerable spot on the knee.
This will open a portal you will need to use in order to gain motes. After taking the portal, mobs will spawn dropping anywhere between 15-18 motes per cycle. This is why it’s necessary for 2 players to go in at a time.
As I mentioned previously you can only carry a total of 10 motes. Once you’ve gotten all the motes. Team 2 can shoot the knee again to open the portal for themselves while taking you out in the process. Once out you will need to run to the corresponding pillar.
If you enter the blue side, you will need to deposit in the blue pillar. The same goes for the orange side. Upon depositing 30 motes into either of the pillars, they will lock out and mobs will no longer be able to sacrifice on it.
When you deposit motes it will give you the enlightened buff. This is important since there will be shielded mobs spawning. Once team 2 is done picking up motes, shoot the knee to pull them out.
After that’s done, team 1 can then shoot the shoulder and go into the orange side. Do the same thing on the other side and lock out the other pillar as well. Before we move on to the DPS phase allow me to explain what builders do.
Each pillar holds a cube above it which as expected is used to tether to the roadblock breakers. The boss will periodically stomp the ground destroying pieces of the platforms you’re standing on during the encounter.
This is where the builders come in. They need to connect the tethers to the breakers in order to rebuild the platforms. Keep doing that until both pillars are locked out.
After you fill up both the pillars the boss will spawn an Angelic. Make quick work of it since you’ll need to do a mechanic right after. The boss will rise up into the air and will spawn a colored plus in the air.
You will need to tether the pillar with the matching color in order to stun the boss. Also, you can start DPSing him at that point, he will lift into the air revealing the plus with the other color. You could in theory extend the damage phase further by tethering the other pillar.
Although a lot of teams opt out of doing that as it wastes a lot of time that can be spent doing more DPS. Sanctified Mind usually takes anywhere between 1-2 DPS phases to be completed.
If you don’t kill him in one phase, just do the mechanics over again and you should be fine. With that Sanctified Mind is defeated and you can claim your epic loot. That concludes the Garden of Salvation.
In conclusion
Regardless of the general feel for the raid, everyone can agree that the aesthetic of the raid is amazing. Despite the beautiful chaos the raid is very fun and should be experienced by everyone at least once.
There’s no experience like playing through the raid for the first time. Some of us aren’t fortunate enough to have a team of our own sadly. So why not try Sherpa?
Our Garden of Salvation Sherpa service will provide you with a team to help you get through the raid with ease of mind. Perfect opportunity to put the knowledge from the guide to good use!
As usual, we’ve prepared a small promotion for the raid while it’s in rotation. You can use the code GARDEN10 for 10% off of all old raid orders until the end of December.
Have fun realizing Saint-14’s vision and eliminating the Vex. Like always, happy hunting Guardian.